Posts Tagged ‘Depression Era Eats’

So I know it’s been awhile since I’ve posted anything about my journey!

I have been busy getting comfortable with the routine and have allocated two days a week to just baking, and generally those days are my days off, hee hee!

Anyhew, this week I opted to make my favorite Three Bean Turkey Chili for dinner!

I posted an ingredient list on my MyTrendingStories blog here

All in all the total cost: $14.31

Doesn’t this look Yummy!

All of the ingredients purchased with our Food Stamps! Part of our weekly shopping!

Ingredients:

Tomato Sauce, Large Can, $0.98

Tomato Paste, 1 Small Can, $0.36

Diced Tomatoes, 1 Can, $0.98

Pinto Beans, Reduced Sodium, 1 Can, $0.58

Kidney Beans, Reduced Sodium, 1 Can, $0.87

Black Beans, Reduced Sodium 1 Can, $0.58

Chili Seasoning, 1 Packet, $0.98

White Ground Turkey, 1/2 lb $5.00 for 1 lb, freeze half for use in Spaghetti Sauce!

Shredded Cheddar Cheese, $2.50

Sour Cream, 1 Small Container, $1.48

Total Cost of Making this Meal: $14.31, less than $15.00 and makes enough for two nights of meals!

Steps are simple, in a sauce pan cook the ground turkey until white, while cooking add 1/2 of the chili seasoning packet – once all of the meat is cooked through add 1 can of tomatoes and 1/2 of the can of tomato sauce, stir, cover and simmer for 10-mins.

In your crock-pot add the other 1/2 of the tomatoes and tomato sauce, the tomato paste and beans (drain the beans), stir together – add the cooked sauce mixture, cover and cook on low for 6-hours.

Serve with shredded cheese and sour cream.

Please Enjoy! I look Forward to hearing all about it!

So in the last month I’ve been asked by My Trending Stories to blog for them about my Food Stamp cooking, shopping and frugal eating journey!

I am very excited about this and have written four posts thus far, I hope my followers here will check them out!

FOOD STAMPS? YOU ARE ON FOOD STAMPS? YES I AM AND PROUD OF IT!
SO YOU ARE ON FOOD STAMPS – CAN I SHOP FREELY?
SO YOU THINK YOU NO LONGER HAVE THE TIME
SOME OF MY FAVORITE, AND AFFORDABLE MEALS!

Please check them out and share – share – share alike!

We had to redirect tonight’s dinner choice mainly because the chicken I’d planned to have was still frozen and well roasting a frozen bird is never a good idea – so I asked my husband what he wanted to make for the kids for dinner and he said SPAGHETTI!

Super easy right?! Well yes!  I went to the grocery store after a gym session grabbed the ingredients I needed and left having only spent $10.98!  The most expensive thing I bought – Bay Leaves! I was out and needed more…go figure!

Anyhew – before we jump into the recipe doesn’t think look so yummy?!?!

This recipe is one my Mom used to make when I was a kid with some slight alterations.

Ingredients:

2-Cans whole tomatoes

1-Can tomato sauce

2-Cans tomato paste

1/2 lb Ground Beef or Turkey – I used Turkey

Spices/Herbs – Ground Parsley, Basil, Oregano, Bay Leaves (whole) Onion Flakes, Garlic Powder, Salt, Pepper and Sugar

Steps:

In your crock pot dump 1 can of tomatoes, the sauce, and one of the cans of tomato paste – add the spices as listed above – roughly 1-2 tsp each, I just shake a small circle of each into the pot.  The sugar though just a Dash – don’t want it too sweet, just cutting the bitterness and acidity of the tomatoes.

Turn your stove burner on to Medium-High, and on your stove top, you are going to brown the meat – meaning cook it until the red of ground beef is brown or the pink of the turkey is white – while it is cooking add the same spices you did to your crock pot, EXCEPT sugar, salt and pepper, none of these are added to the meat – this is layering of the flavors – once the meat is cooked through, add 1-Can of the tomato paste and 1-can of tomatoes – stir well, reduce the heat and let simmer for – 5-10 mins covered.

Add the meat mixture to your crock pot, stir well, cover and cook on high 3-4 hours or low 6-8 hours.

When ready, cook pasta and serve!

I hope you enjoy this sauce as much as I do! Took me back in time to when Mom would make it for me as a kid!  Oh and the leftovers freeze VERY well and actually taste really good when re=heated later 😉

So as of late I have been working to try new items and streamlining them into our daily day-to-day life, I’ve added to my repertoire if you will some homemade chocolate syrup!

The homemade version uses water, unsweetened cocoa powder, sugar and vanilla, it’s a little more bitter than the Hershey’s syrup, but I still enjoy it!

Then last night I made some yummy chicken!

The chicken is super simple:

Extra Virgin Olive Oil

Salt/Pepper

Garlic Powder

Onion Flakes

Parsley

Basil

White Vinegar

Mix well in a bowl, coat the chicken, saute in a cast iron skillet to brown on each side, finish cooking in an oven heated to 350-Degrees until cooked through.

Tonight we try, bread, cookies and biscuits – so I guess I need to get on it!

But first, I hit the grocery store today to shop for groceries for these meals:

Sun: Spaghetti (was yummy BTW)

Mon: Pot Roast

Tues: Stroganoff

Wed: Hot Dogs/Ham Sandwiches

Thurs: Leftovers

Fri: Pizza

Sat: Roast Chicken

Sub Total Spent: $44.37

WOW!!! I have a lot of items left over in the house from previous items, so I am re-using a lot of items…WOAH!

Today was a busy one for sure! We were super busy making three (3) different breads using two recipes!

Super Stoked about how they all came out!

First it was more bread for the house, of course, it was time for more sandwich bread to be made, so we made more! And using some of the dough from the initial recipe I posted a couple of days ago I made some cinnamon rolls.  I’ve been making cinnamon rolls with my Mom for Christmas every Black Friday for years so I just rolled the dough out, basted it with melted butter and then sprinkled cinnamon and sugar over it – rolled it up into a long form – then my son cut the roll up into pieces for rising and baking.  Check it out!

Looking forward to eating the cinnamon rolls for breakfast!

Then when the breads were done, we left the oven on and put together some Hot Dog rolls for dinner tonight, ML sent me her recipe for hot dog buns and it was super easy to make and then form them into rolls – my son handled the forming of the buns.  Less than 10-Mins later we had awesome rolls for tonight’s dinner!


The rolls were filling and made for a solid meal! I put ham steak on mine and ate it as a sandwich – I have some leftover for lunch tomorrow!!!

Was a very busy day, I am exhausted, but very pleased with what we did today!

Can’t wait to venture through tomorrow!

Today’s adventure launched us into both breakfast and dinner!

First was using ML’s Pancake Recipe she posted on her first blogpost

Pancakes and My Sudden Shift Into Frugality


I have made the bulk recipe and used this today! The kids enjoyed the pancakes and I did as well with some YUMMY Morning Coffee!

Was super simple and easy for my half-awake brain to accomplish at 6:30 this morning! LOL!!!

So then tonight we opted to make a Pot Roast – my hubs made it entirely on his own!

I will try to write out the recipe here

Ingredients:

2 – 3 lb Chuck Roast

1-2 Large Red Potatoes (peeled and sliced)

Green Beans (we used frozen ones)

Carrots

1 Large Yellow Onion

Sea Salt

Black Pepper

Onion Flakes

Thyme

Garlic Powder

2 tbsp Vegetable Oil

1 tsp White Vinegar

3-Cups Water

Steps:

Pre-Heat Oven to 275-Degrees

To make a broth, boil together Water, Vinegar, Vegetable Oil, Onion Flakes, Garlic Powder, Salt & Pepper, and Thyme. Lower heat to medium to reduce.

Season the beef with just the Black Pepper

Sear the chuck roast to seal in the juices over medium-high heat until brown on all sides.

In the same pan you used to sear the beef, heat the potatoes until they are browned remove potatoes and add to the beef pan – add the onions and cook until clear, remove onions and add to the beef pan.

Line the Bottom of a 9 x 11 x 2 pan with foil

Add the beef, broth, vegetables, seal the foil, bake in pre-heated oven for 3.5 hours. Or until falling apart.

Serve with Slices of bread toasted.

Enjoy!

I certainly enjoyed it tonight!

So I’ve been getting a LOT of requests from Facebook for the bread recipe I posted about the other day here Using our Food Stamps to Bake Bread, and with permission of the amazing author ML Gardner I am sharing her recipe here, so Thanks ML for the recipe and permission!

So go gather your Supplies and let’s have fun baking! You’ll need roughly 20-Mins Prep Time, an hour and a half of rising time and another 22 mins of baking time, so make sure you set aside a good chunk of time.

Ingredients:

6-Cups Flour split into two 3-Cup Portions

3-tbsp Sugar

1 – tbsp Salt

2-tbsp Shortening

2-pkgs Yeast (NOT the fast rising yeast) or 4 1/2-tsp of reg. yeast

2 1/4 Cup Warm Water – NOT Hot that will KILL the yeast

You will need 2-Bread Pans, this recipe yields two loaves of bread

Process:

In a large bowl/mixer- mix 3-Cups flour/water with everything else, when all mixed together slowly add the remaining 3-cups of flour 1-cup at a time until it’s all worked in.

If the mixture is still too wet, add flour in small amounts until mixture is not as wet.

Knead this mixture for 5-Mins, should form a ball that looks like pizza dough.

Cover and let rise for 60-Mins

*hint my Mom’s used for eons, heat oven on 200-degrees for 1-Min, turn off the oven, cover dough in bowl with towel and place into warm oven for rising*

Punch down and form bread into bread pans

Cover and let rise again for 45-Mins

*re-heat your oven as you did previously*

When 2nd Rise is complete, bake loaves

If using short pans, 425 x 20 – 25 mins, my oven only required a 22-Minute bake time

If using long pans, 375 x 20 – 25 mins.

Tap the top of the loaf, it should be golden brown and have a hollow sound – this determines doneness.

And there you have it! ML suggested putting some butter over the bread top when it comes out of the oven to soften – I used margarine to do this the other day and the butter taste was overpowering – so if doing this use salted butter – the real deal!

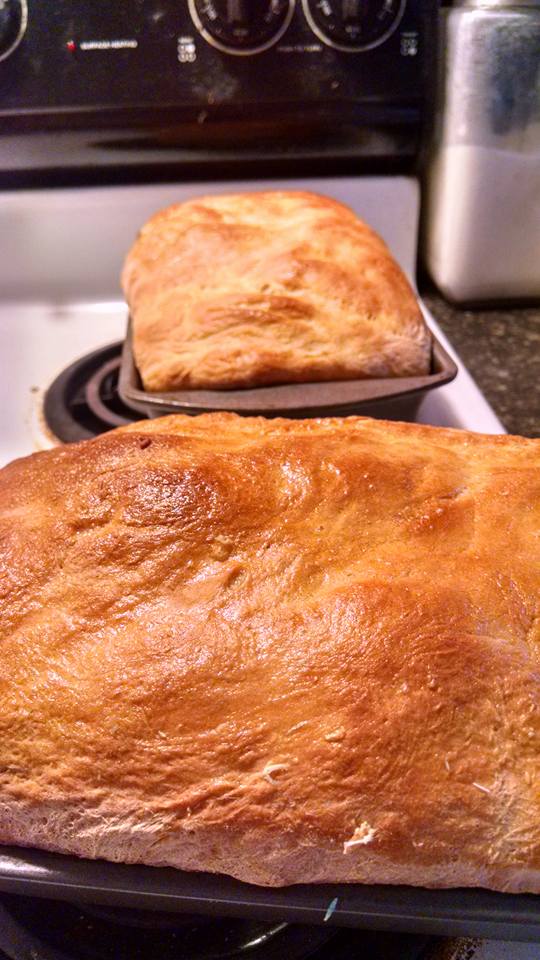
Finished Bread Loaves

Done Baking

This bread is good for sandwiches, as a side to spaghetti or as toast! It’s very multi-dimensional!


Yes you read that right, I used my Government Issued Food Stamps to purchase the ingredients required to bake bread!  I have always believed that just because we are using Food Stamps does NOT mean we have to eat crud! They work for any and all food items inside of the grocery store and with a little effort those on Food Stamps can eat whatever they want! So I have for awhile now always used them to purchase components for meals slowly weeding out pre-made foods.  Today I used those funds to purchase the items necessary to make Bread!

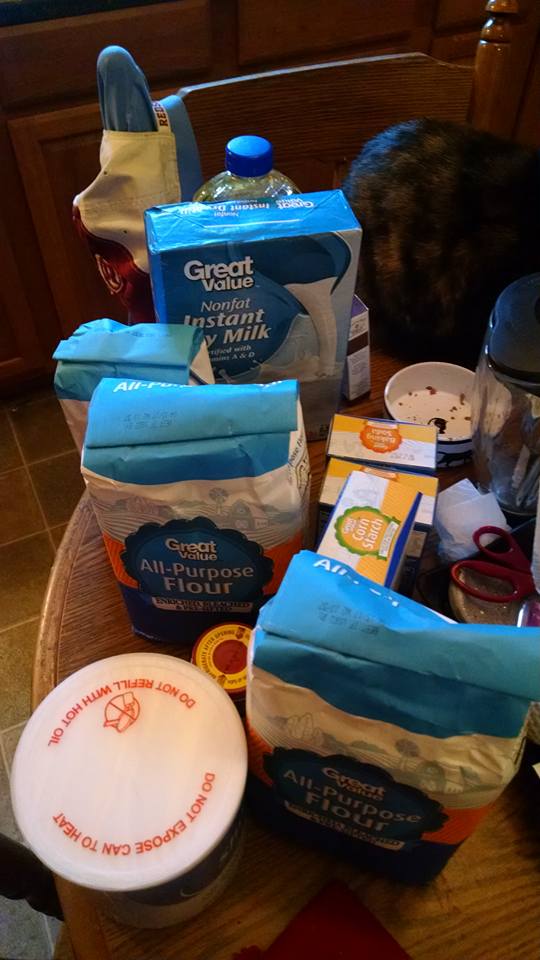
Groceries

This morning I embarked on my adventure with author ML Gardner to live and eat using the same techniques they did during the Great Depression.  Today’s adventure was baking our own bread – she sent me her recipe for bread and I went about making a shopping list and off to Wal-Mart I went at 6:00 am this morning!

My shopping list included:

– Flour

– Yeast

– Sugar

– Shortening

– Oil

– Instant Nonfat Milk

– Corn Starch

– Baking Powder

– Baking Soda

– Vanilla Extract

– Spaghetti Sauce

– French Bread (recipe coming later)

– Fruit/Veggies

– Eggs

– Roasting Chicken

– Deli Meats

– Gallon of 2% Milk

– Vitamins

– Cat Food

Some of these items were not for the bread, but in the same aspect I did manage to walk out of Wal-Mart having spent $92.00 – of that, $27.00 was our Savings Catcher Funds!

Simple as pie really!  Came home and got to work assembling her bulk pancake mix dry goods and then baking two loaves of bread for the house! Check it out!

So for those living on Food Stamps – don’t think you are limited to just those pre-fabricated foods in the store, use them for ingredients, take the time, cook and prepare your own foods, those monies will go that much further every month!

I am excited to see where we go from here! I’ve laid out our meals through Wednesday of next week and will need to do more shopping and baking on Tuesday when I am off work.

On next, an update on how we live and cook the next few days!